Precise Engine Block Machining in Mannheim
How to get precise machined surfaces for commercial truck engines.
If machining truck engine bores must be precise by its very nature, it must be even more so in Mannheim, Germany, the home of Mercedes-Benz truck manufacturing. Common knowledge dictates corresponding surfaces in the engine block must be machined with the utmost accuracy to ensure superior performance. Engine block surfaces have complex geometry and numerous key characteristics demanding the highest tolerance classes. Depending on the engine type, these include multiple H7 fits, various areas with accuracy specifications less than 15 μm and a 20° chamfer with an outlet, at an angle tolerance of ±0.025°. Naturally, cost-efficiency is also a tight focus.

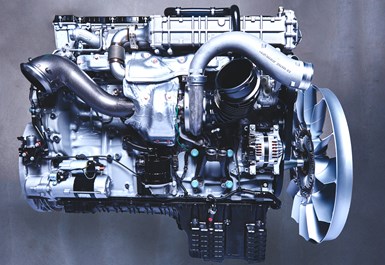
Mercedes-Benz OM 471 powertrain used in its Acros trucks. (Image: Daimler)
Thanks to the close cooperation between the specialists from Mercedes-Benz, the machine manufacturer and MAPAL (www.mapal.com), significant advances took place when a new production line for machining engine blocks was designed.
For New Tools, Look to the Past
Mercedes-Benz commissioned its first line for machining these engine blocks in 2011.
When planning the second line, the team drew on their experience with the first line. They identified machining the bores for the cylinder liner adapters as a particular challenge. Here the machining was divided into two stations: pre-machining and fine machining.

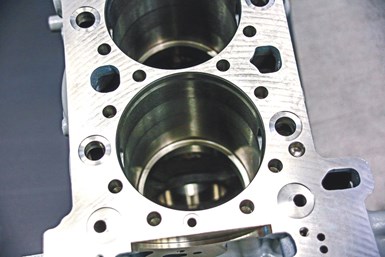
Truck engine blocks have many high-tolerance holes, chamfers and surfaces. (Image: MAPAL)
According to MAPAL, the company looked to complex actuating tools equipped with up to 20 indexable inserts, including ISO inserts and custom geometries. The actuating tools feature a monoblock tool body and HSK-160 connection that shows an enlarged face surface with a 200-mm diameter, a total tool length of 380 mm and a mass of up to 60 kg. Despite the length, width, and girth, specs require the tool to have a radial
run-out accuracy of 3 μm. “Actuating” means tool slides are actuated by a drawbar via an additional NC axis in the machine controller. It had to be integrated in the HSK connection and suitable for the automatic tool changer. MAPAL reported solving this challenge with a high-precision bayonet coupling used to couple the drawbar automatically during a tool change.
Inside the tool, carbide ramps transfer drawbar movements to the slides. To achieve the required quantities, three spindles machine three bores simultaneously. Three tools per machine are each assigned to a particular spindle for process reliability, meaning for each tool, there are a sister tool and a further reserve tool for regular maintenance work and or needed repairs.
Given the precision nature of the work required, the amount of manual manufacturing tool work at MAPAL was very high. For example, slide shafts in the tool body were lapped by hand. Manual working time for each of these tools amounted to multiple man weeks.
Changing Tool Changing
With machining operations like these, the cutting edges of such tools are usually replaced and adjusted in the working area of the machine. Due to the cooling lubricant, this is not only messy and uncomfortable for the machine operator, the machine is also not producing during this time. In three-shift operation and with three tools per machine, such downtime would amount to three to four hours per day.

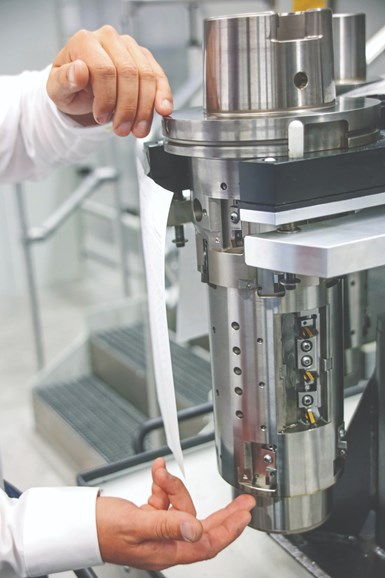
At a length of 380 mm, total runout variation of the tool must not exceed 3 µm. (Image:MAPAL)
Together with the employees from Mercedes-Benz and the machine manufacturer, MAPAL consequently developed a concept for an automatic tool change and for adjusting the tools outside the machine. “This may sound mundane at first, as this is quite a normal procedure with machining systems,” MAPAL reports, “however, the dimensions of the tools alone indicate the extent of the challenge in this case. Given that a machine with an automatic tool change for this type of machining and these dimensions is a world first, the project required a great deal of innovative spirit and the courage to try out new things from all project partners.”
In an effort to ensure external adjustment is as simple as possible, MAPAL developed corresponding devices for transporting, adjusting, and maintaining the tools. This includes a handling solution for inserting and replacing tools in the magazine as the tools are inserted into the machining system while hanging. Due to the high tool weight of around 60 kg (132.3 pounds), the effort of just “turning over” the tool twice manually would put personnel under a lot of strain. Add that safety and ergonomics would also play major roles. Furthermore, there would have been a risk that the tool could be damaged in the process. As a result, MAPAL designed and built two unique setting fixtures into which tools are inserted in a hanging position. A cart for hanging transport between the machining system and the setting fixture was also developed. Tools are thus transported and adjusted in the same position in which they are used in the machining system.
Measurement results determined on the setting fixtures are transmitted directly to an RFID chip on the tool. The controller of the machining system reads it out when tools are inserted. This way, the machine can readjust some of the important measurements using the actuating slides during machining. Results of the routine QA measurement are taken into account. This closed quality-control loop for the tools was a high priority for Mercedes-Benz.
Always Analyzing
Dr. Wolfgang Baumann, who is responsible for the product range of tools with ISO elements at MAPAL, says the company never takes its eye off cost efficiency. “Through our work with special applications, we’ve accumulated extensive in-depth knowledge that has been incorporated into the development of our tools and systems. In many cases, other tools were superseded once we had analyzed the application and selected the optimal tool,” he explains.
“For some applications, our tools now machine significantly more parts until the inserts have to be replaced. And in some other machining operations, the same machining times per part can be achieved with fewer inserts. However, there are other cases where we can achieve considerably higher cutting data with more. We sometimes rely on indexable inserts with more cutting edges, thanks to which each individual indexable insert can be used for considerably longer, resulting in lower cost per part.”
RELATED CONTENT
-
On Fuel Cells, Battery Enclosures, and Lucid Air
A skateboard for fuel cells, building a better battery enclosure, what ADAS does, a big engine for boats, the curious case of lean production, what drivers think, and why Lucid is remarkable
-
on lots of electric trucks. . .Grand Highlander. . .atomically analyzing additive. . .geometric designs. . .Dodge Hornet. . .
EVs slowdown. . .Ram’s latest in electricity. . .the Grand Highlander is. . .additive at the atomic level. . .advanced—and retro—designs. . .the Dodge Hornet. . .Rimac in reverse. . .
-
Mustang Changes for 2018
On Tuesday Ford unveiled—using the social media channels of actor Dwayne Johnson (this has got to unnerve some of the auto buff book editors)—the 2018 Mustang, which has undergone some modifications: under the hood (the 3.7-liter V6 is giving way to a 2.3-liter EcoBoost four, and a 10-speed automatic is available), on the dash (a 12-inch, all-digital LCD screen is available for the dashboard), at the tires (12 wheel choices), on the chassis (MagneRide damper technology is being offered with the Mustang Performance Package), and on the exterior (three new paint colors). And while on the subject of the exterior, there are some notable changes—a lower, remodeled hood, repositioned hood vents, new upper and lower front grilles, LED front lights, revised LED taillamps, new rear bumper and fascia.


